How to Make Smart Stick for Blind People Using Arduino Nano, Ultrasonic Sensor, and Buzzer
How to Make Smart Stick for Blind People Using Arduino Nano, Ultrasonic Sensor, and Buzzer
January 17, 2025
Key Features
- ✓Complete source code included
- ✓Detailed documentation
- ✓6 months technical support
Description
Introduction
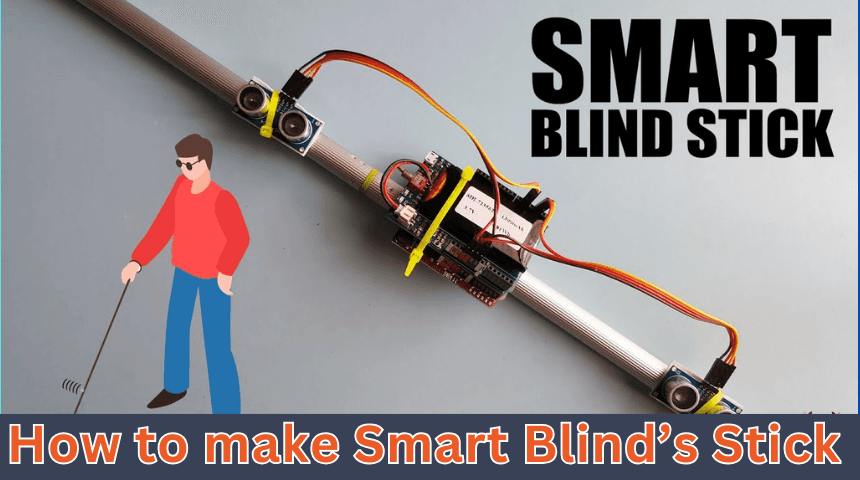
This project involves creating a smart walking stick to assist visually impaired individuals in detecting obstacles in their path. The smart stick uses an ultrasonic sensor to sense nearby objects and a buzzer to provide audio feedback, alerting the user about the obstacle's proximity.
Hardware Required
- Arduino Nano
- Ultrasonic Sensor HC-SR04
- Buzzer
- 9V Battery with Connector
- Resistors (330Ω, optional for LED)
- Small Breadboard or PCB (optional)
- Jumper Wires
- Stick or Cane
Software Required
- Arduino IDE
Component Details
1. Arduino Nano

The Arduino Nano is a compact microcontroller board based on the ATmega328P. Its small size makes it ideal for portable applications like this project. Key features include:
- 14 digital I/O pins (6 can be used for PWM output)
- 8 analog inputs
- USB interface for programming
2. Ultrasonic Sensor HC-SR04

This sensor measures distance using ultrasound waves. It has a transmitter that emits ultrasonic waves and a receiver that detects the reflected wave (echo). The time delay between transmission and reception determines the distance.
3. Buzzer

A buzzer is used to provide audio feedback when an obstacle is detected. It emits a beeping sound whose frequency can be controlled programmatically.
Working Concept
1. Obstacle Detection: The ultrasonic sensor emits an ultrasonic wave. If the wave hits an object, it bounces back and is received by the sensor.
2. Distance Calculation: The Arduino Nano calculates the distance to the obstacle based on the time taken for the echo to return.
3. Alert Mechanism: If the distance is below a predefined threshold, the buzzer activates, alerting the user.
Circuit Diagram
Connections:
1. Ultrasonic Sensor (HC-SR04):
o VCC → 5V (Arduino Nano)
o GND → GND
o Trig → D2
o Echo → D3
2. Buzzer:
o Positive Pin → D9
o Negative Pin → GND
3. Power Supply:
o Connect the 9V battery to the VIN pin of the Arduino Nano to power the entire system.
Program Code
Here’s the code to make the smart stick functional. Upload it to the Arduino Nano using the Arduino IDE.
Code
#define trigPin 2

#define echoPin 3

#define buzzerPin 9


long duration;

int distance;


void setup() {

    pinMode(trigPin, OUTPUT);

    pinMode(echoPin, INPUT);

    pinMode(buzzerPin, OUTPUT);

    Serial.begin(9600);

}


void loop() {

    // Send ultrasonic pulse

    digitalWrite(trigPin, LOW);

    delayMicroseconds(2);

    digitalWrite(trigPin, HIGH);

    delayMicroseconds(10);

    digitalWrite(trigPin, LOW);


    // Receive echo

    duration = pulseIn(echoPin, HIGH);

    distance = duration * 0.034 / 2; // Convert to cm


    if (distance < 50 && distance > 0) { // Threshold distance

        tone(buzzerPin, 1000); // Activate buzzer

        delay(100);

        noTone(buzzerPin);

    } else {

        noTone(buzzerPin); // Turn off buzzer if no obstacle

    }


    Serial.print("Distance: ");

    Serial.print(distance);

    Serial.println(" cm");


    delay(100);

}
Assembly
1. Attach the components (Arduino Nano, ultrasonic sensor, and buzzer) to the stick or cane securely using tape or glue.
2. Connect the ultrasonic sensor to the front end of the stick for obstacle detection.
3. Use jumper wires to connect the components as per the circuit diagram.
4. Power the system using the 9V battery.
Conclusion
This Smart Stick for Blind People provides a simple yet effective way to improve mobility and independence for visually impaired individuals. It can be further enhanced with GPS modules or voice assistance for more advanced features.


